Google Photos is one of the best photo viewers in android due to many unique features like unlimited drive backup, Videomaker, Gif maker, Collage, I’m Feeling Lucky, etc. It works natively on smartphones, but not many people know that this is available for Windows devices also, because you cannot find it on the windows store. Google Photos was available back then in 2018, but due to some kind of conflict between Google and windows, it was taken down from the windows store. Since then, Google Photos for Windows has never shown up in the Windows store.
Also read: How to get Google Photos Unlimited Storage
Can Google Photos be used on Windows 10?
Google photos are not available on windows store, but it doesn’t mean that you cannot download and use it on your Windows 10. There is a way around to use it by downloading the software from the official Google photos website and installing it like standard software. Here in this article, you will learn how to install & setup Google Photos for Windows 10.
Getting Started with Google Photos for Windows
Download: Google Photos (windows 10)
- Download Google photos software from the above download link.
- Run the downloaded link, and it will automatically download the software from the google server.
- Now install it and open the software.

- Click on the GET STARTED button to go to the login page.
- Fill your google account credentials linked with Google photos.
- If you get an error message, then click on the Sign in with your browser instead of link at the bottom.

- Clicking on the link will lead you to the default browser’s Google login page.
- Then, login by your Google account linked with Google Photos and allow the permission if prompted. Once login is successful, you will receive a success message.
How to Setup Backup Folder in Windows
I assume that you are already successfully logged into the Google Photos software. You will get two options either Backup photos and videos or Backup all file types. So, select any option and proceed with the NEXT button.
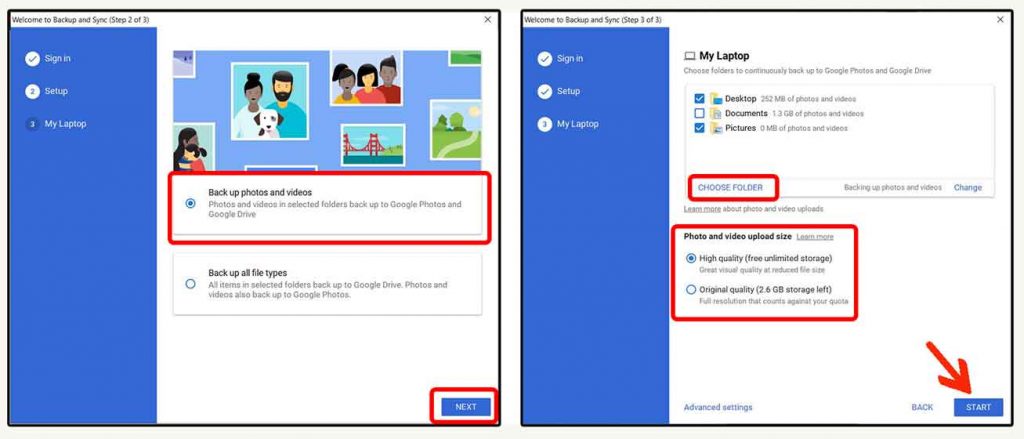
Now a default backup folder location will appear, you can change it to the folder of your choice by clicking the CHOOSE FOLDER option.
Now you will be given two option to select Photo and video upload size.
- High Quality will provide Unlimited storage (with standard compression)
- Original Quality (drive storage max 15GB storage)
Select any one of the option and then press START button to start uploading process.
Wrapping Up
Google Photos complete feature is not available, but the upload & sync is enough for now. The features are limited for sure, but that’s all we have for windows. If you guys know any other method to use its full functionality, please do let us know in the comment and we will update the article if the content seems promising.